How to make spooky fence posts, gates, for a haunted house, cemetery or graveyard scene
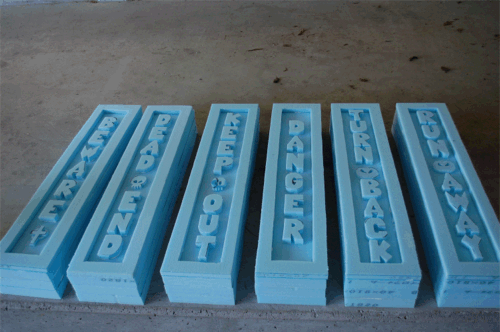
Making a cool looking fence post for a Halloween display is easy, cheap and quick to do. You can make cemetery fence posts with warning signs like “Danger”, “Turn Back!”, “Dead End!” and so on. Here’s what the fence posts could potentially look like, but you can customize them any way you’d like:
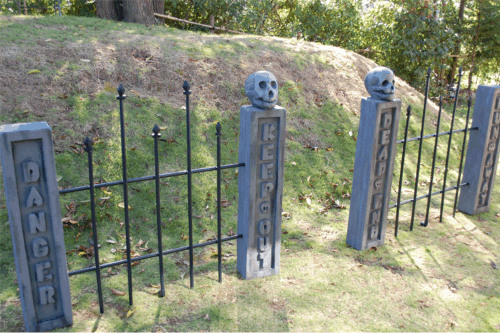
(To make the fence sections, see the posts on how to make a cemetery fence.)
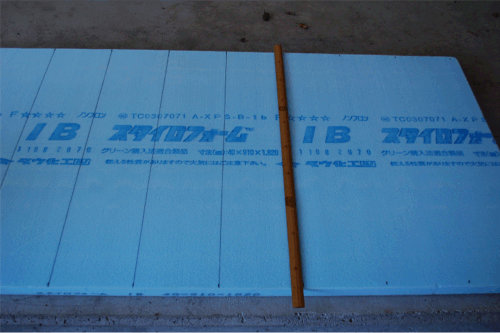
What you need to make fence posts for a Halloween display: (makes 6 posts)
- – 2 foam board 40mm in thickness (about $16/each)
- – 1 foam board 20mm in thickness (about $14/each)
- – glue (a big jar)
- – 1 large can of gray water-based house paint (about $20)
- – a little black and chocolate brown water-based paint
- – paint brushes (medium and small)
All prices will vary, but I estimate it cost about $10 for each of the posts I made. The whole process took about 1-1.5 hours/post. (I spent about 8 hours to make 6.)
Instructions on how to make a graveyard fence post:
First I decided on my width (20cm) and height (90cm). My foam board was 90cm wide so I just measured out 20cm segments and then cut up the board. I glued 3 pieces together to make a post with a depth of 12cm. See the pictures below:
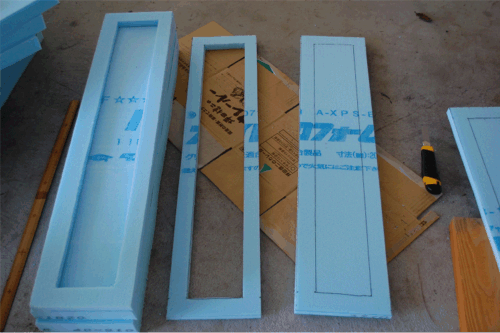
Then using the thinner piece of foam, I cut a frame to go on the front of my post. You can carve into the foam, but it is really messy and foam dust goes very where. This method is very clean and simple. Add the frame to the top and glue all 4 pieces together.
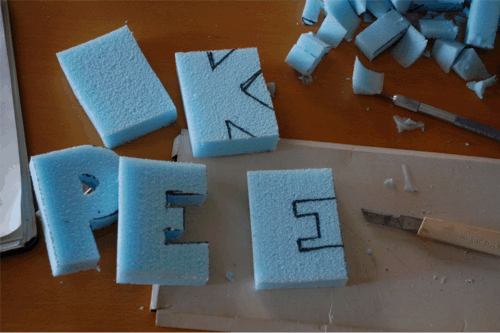
Using the piece that was left over from making the frame, you can cut out letters for your warning sign or, just cut out shapes, like skulls and jack o’ lanterns. I chose my phrases and then using the longest phrase, roughly decided on a letter height. I just made block letters, cut them out and glued those on as well.
You’ll need to let those dry for a day or two depending on the type of glue you used.
Once dry, it’s best to sand everything down. Make sure they stand and smooth any surfaces that may not line up perfectly. You also want to get rid of any sharp edges because after all, these are very old. ;) Don’t worry if pieces break off or aren’t exactly perfect. The more messed up, the better. You can actually break pieces of and age the posts yourself if you want.
Sanding the pieces down also makes them easier to paint. The foam tends to have a lot of pores and when you sand it down, it decreases these saving time and paint.
Painting and aging the sign posts:
Don’t use spray paint! The aerosol will eat your foam and you’ll be starting all over. I painted mine with gray first. Then while the paint is wet, I went back and added black and chocolate brown accents where they might have gotten dirty or water would have run down.
I find that you need to go overboard with these. If you just have subtle marks here and there, they won’t show up when the paint is dry. Also, adding your dirtying while the paint is still wet means the paints will blend together a little better.
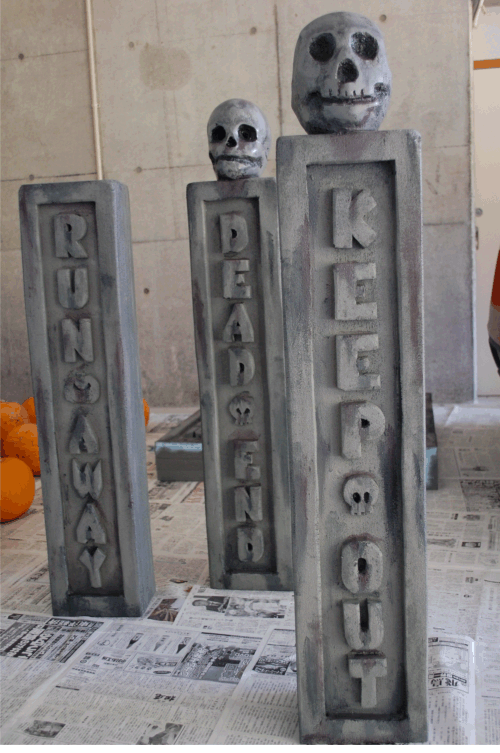
I bought some foam mannequin wig stands for about $5 each. I used those instead of skull props from a store simply because I couldn’t find any where I am. Add something to the top of your posts if you’d like and paint them with the same gray paint to get the same feel and dirtying.
I hope your display turns out fabulous! If you want to make a spooky tree or need info on making the actual fence part, see the previous posts.

October 5th, 2011 at 4:16 am
[…] how to make spooky fence posts, see the next […]
October 18th, 2013 at 1:23 am
trying to find out what size pvc pipe you used for the fence, the smallest size I can find is 1/2 “
October 19th, 2013 at 2:54 pm
Cathy – The pipes were 1.8cm which is a little larger than a half inch. A half inch sounds a little thin, but it depends on what you are fencing in, I guess.
October 9th, 2014 at 7:29 am
Did you use regular hot glue? :-)
October 9th, 2014 at 11:40 pm
Sherry – I didn’t. I used a glue like Elmers, but it takes a couple days to dry. Regular hot glue in a glue gun works with foam. You can put spots on the edges and a few in the center. That should hold the whole thing. Hot glue is great but I don’t use it with large projects. The glue dries too fast and it’s not a fun race. You’ll have about 1-2 seconds to make sure your piece is in the proper position.
September 8th, 2015 at 12:42 pm
What size are your letters?
September 9th, 2015 at 12:44 am
Alegna – I’m not sure of the precise dimensions, but about 2.5 inches tall. I just took my longest phrase, “turn back” and made sure that it would fit within the frame. Then I made all of the other letters the same size. So, I would suggest doing that – make your fence posts and then cut a block out. Using the block make sure 8 or however many letters that size will fit.
Good luck with the project!
October 31st, 2015 at 5:08 am
How did you stick the posts on the lawn? BY the way you are a genious!! Your explanation is very easy to follow. Thank you very much for sharing it. ?
November 1st, 2015 at 3:51 am
Thanks! I’m glad you like the post. I try to keep the posts brief and simple, but I sometimes worry that they are too brief :)
I use garden stakes. They are 1m flower supports. I’m not sure what they are called, but you can probably find something in the garden section of a home improvement center. You just need something sturdy that will go into the ground and fits inside the PVC pipe.
I hope you can find something that will work and that your project is a success!